Monday, July 8, 2013
How to make your own aluminum-free baking powder
This is certainly not my own recipe, but I thought you might all be interested in knowing that you can make your own
baking powder for cheap without the aluminum ingredient and taste. (http://www.europeancuisines.com/how-to-make-your-own-aluminum-free-aluminium-free-baking-powder-from-scratch)
To make the one teaspoon of commercial baking powder, mix together:
1/2 teaspoon cream of tartar
1/4 teaspoon baking soda
1/4 teaspoon cornstarch
I plan on making this in bigger quantities and then will refill my baking powder cantainer.
Thursday, January 31, 2013
Orange-Citrus Vinaigrette
1 Tbsp. lemon juice
2 tsp. balsamic vinegar
½ tsp. salt
Freshly ground black pepper
1 Tbsp. extra-virgin olive oil
1-2 Tbsp. diced red onion
¼ cup orange juice
Mix all together and serve on bed of lettuce, red onions, tomatoes, carrots and cucumbers.
Tuesday, January 22, 2013
Healthy Sweet Potato Fries (by Mommypotamus)
2 sweet potatoes, peeled, and cut into strips
1-2 tablespoons coconut oil, warmed up to liquify it
salt and pepper to taste
Line a cookie sheet or baking dish with aluminum foil and then place the sweet potato strips onto the foil.
Pour the liquid coconut oil over the sweet potatoes and use hands to mix it all evenly together. Then sprinkle
salt and pepper and make sure all sweet potatoes are spread out in a single layer so that they can cook
evenly. Place in oven on top rack for 30-40 minutes. Done.
Variation:
Add cinnamon or chipotle pepper to spice it up!
Monday, October 29, 2012
Healthy Chocolate Cookie Dough (by Chocolate Covered Katie)
1/4 cup cashews
2/3 cup pitted dates (no extra sugar added)
1/4 tsp. vanilla extract
pinch of sea salt
1 tblsp. unsweetened cocoa powder
Grind it all up in your food processor or vitamix until it forms into a ball of dough. Eat it as is by the spoonful or smear it onto crackers or bread.
2/3 cup pitted dates (no extra sugar added)
1/4 tsp. vanilla extract
pinch of sea salt
1 tblsp. unsweetened cocoa powder
Grind it all up in your food processor or vitamix until it forms into a ball of dough. Eat it as is by the spoonful or smear it onto crackers or bread.
Wednesday, October 17, 2012
Tanya's Gyro Soup
2 lbs. of pork/chicken, cut into strips
3 tblsp. olive oil
1 cup heavy whipping cream
3-4 bell peppers (I prefer using different colored ones for better presentation), chopped
2 large onions, chopped
6 cups of water
8 tblsp. chili sauce
1 8 oz. pkg. shredded mozzarella cheese
5-6 tblsp. paprika
2 tsp. marjoram
1 tsp. basil
1 tsp. thyme
1 tblsp. pepper
1 tblsp. salt
4 garlic cloves, minced
1 tsp. garlic salt
2 tsp. oregano
2 pkg. onion soup mix
In a pan, saute 1 tblsp. of olive oil with meat, garlic cloves, and all the seasonings except the salt and pepper. When the meat is cooked all the way, add the whipping cream to it and set aside.
In a big pot, add the rest of the olive oil, chopped onions and chopped bell peppers. Add salt and pepper to it and saute on medium heat until onions and bell peppers are almost done. Add the 6 cups of water and the onion soup mix packages. Let boil for about 5-10 minutes before adding the chili sauce. Add the chicken and whipping cream mixture to the soup. At the end, add 1/2 the package of mozzarella cheese and salt and pepper to taste.
Serve with some kind of bread (French bread of baguette bread) and salad and the rest of the mozzarella cheese.
Thursday, September 27, 2012
Apple Cobbler
I have never been a fan of pie crust, so I combined my mother in-laws apple crumb pie recipe (without the pie crust) with an apple cobbler recipe and the outcome was delicious!!!!!!
Filling:
6 Gala apples, peeled, cored and cut into small bite-sized pieces
2 tblsp. lemon juice
2 tsp. cinnamon
1/2 tsp. nutmeg
1/2 cup sugar
Combine the above ingredients and place them in a pie pan. Then combine the topping ingredients and pour them on top of the filling and bake in oven at 350 degrees for 45 minutes or until bubbly and brown.
Topping:
3/4 cup flour
6 tblsp. butter (not melted, mixed in with flour and sugar by using a pastry blender)
1/2 cup sugar
This recipe was fast to prepare and tastes best with a scoop of vanilla ice-cream! Enjoy!
Monday, September 17, 2012
Quinoa and Black Beans
I just made this dish last night and it was delicious! I ate the leftovers for lunch today and added fresh avocados and it was even better. I imagine you could also add some queso fresco for those of you who are cheese lovers!
|
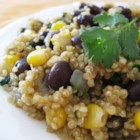 |
Submitted By: 3LIONCUBS
Photo By: Dianne
|
"Whether you're
trying quinoa for the first time or just trying a new recipe for quinoa,
this mixture of quinoa, black beans, corn, and spices will make this
dish a new favorite."
Ingredients:
1 teaspoon vegetable oil
1 onion, chopped
3 cloves garlic, peeled and chopped
3/4 cup uncooked quinoa
1 1/2 cups vegetable broth
1 teaspoon ground cumin
|
1/4 teaspoon cayenne pepper
salt and pepper to taste
1 cup frozen corn kernels
2 (15 ounce) cans black beans, rinsed
and drained
1/2 cup chopped fresh cilantro
|
Directions:
| 1. | Heat the oil in a medium saucepan over medium heat. Stir in the onion and garlic, and saute until lightly browned. |
| 2. | Mix quinoa into the saucepan and cover with vegetable broth. Season with cumin, cayenne pepper, salt, and pepper. Bring the mixture to a boil. Cover, reduce heat, and simmer 20 minutes, |
| 3. | Stir frozen corn into the saucepan, and continue to simmer about 5 minutes until heated through. Mix in the black beans and cilantro. |
Subscribe to:
Posts (Atom)